Dieser Artikel bezieht sich auf das Produkt Professional Email (powered by Titan). Wenn Sie ein Professional Email Indiviudal oder Teams nutzen bzw. ein Microsoft 365, gehen Sie bitte auf unsere FAQ Startseite https://www.hosteurope.de/faq/ und wählen Sie dort den richtigen Produktbereich Professional Email oder Microsoft 365 aus. Dort finden Sie die passenden Informationen.
In diesem Artikel finden Sie Informationen wie man ein Professional E-Mail Konto in Apple Mail auf dem Mac einrichten kann.
Einrichtung Apple Mail
Öffnen Sie Apple Mail und klicken oben auf Mail - Account hinzufügen".
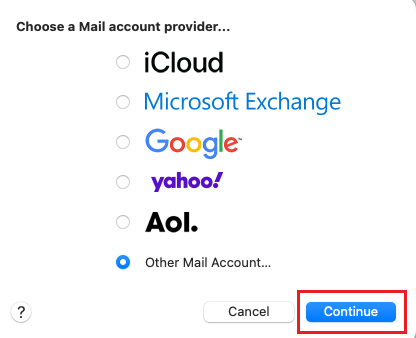
Wählen Sie "Anderer Account" aus und klicken auf "Weiter":
Sie werden nun aufgefordert, Ihren Namen, die E-Mailadresse und das Passwort einzugeben:

Wählen Sie als Kontotyp bitte IMAP aus und hinterlegen die restlichen Angaben wie folgt:
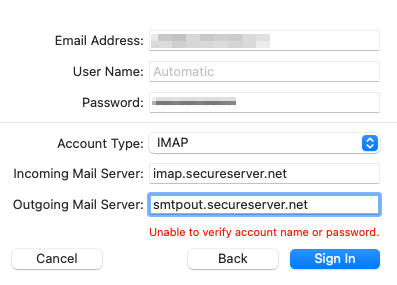
Kontotyp: IMAP
Server für eingehende E-Mails: imap.secureserver.net
Server für ausgehende E-Mails: smtpout.secureserver.net
Das Konto ist nun eingerichtet.
English Version:
This article refers to the Professional Email product (powered by Titan). If you use Professional Email Individual or Teams or Microsoft 365, please go to our FAQ homepage https://www.hosteurope.de/faq/ and select the correct product area, Professional Email or Microsoft 365. There you will find the relevant information.
Setting up Apple Mail
Open Apple Mail and click on "Mail – Add Account" at the top.
You will now be prompted to enter your name, email address, and password
In the next step, you will be asked to choose the account type:
Please select "Other Mail Account" and click "Continue".
Now enter your password and the incoming and outgoing mail server settings as follows:
Accounttype: IMAP
Incoming Mail Server: imap.secureserver.net
Outgoing Mail Server: smtpout.secureserver.net
Your account is now set up.