Nachdem Sie die Sicherheitsstandards oder die Multi-Faktor-Authentifizierung (MFA) aktiviert haben, sollten Sie Ihre bevorzugte Anmeldemethode einrichten, um Ihre Identität bei jedem E-Mail-Login zu verifizieren. Da Passwörter vergessen oder gestohlen werden können, bietet eine zusätzliche Anmeldemethode erheblichen Schutz vor unbefugtem Zugriff auf Ihr Konto.
Sie haben die Möglichkeit, die Microsoft Authenticator-App oder eine andere Authenticator-App (z.B: Google Authenticator) als Authentifizierungsmethode 1 festzulegen. Sie können entweder eine Benachrichtigung bestätigen oder einen zur Verfügung gestellten Verifizierungscode eingeben. Zusätzlich kann eine der folgenden Optionen als Methode 2 eingerichtet werden.
Bevor Sie fortfahren, stellen Sie sicher, dass Sie sowohl Ihren Computer als auch Ihr Smartphone zur Hand haben.
Hinzufügen zusätzlicher App (Neuen QR Code generieren)
Erstmalige Einrichtung:
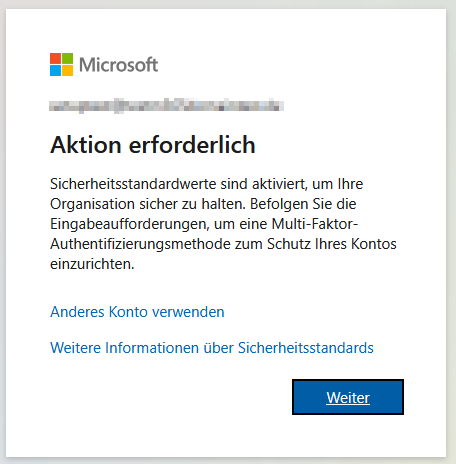
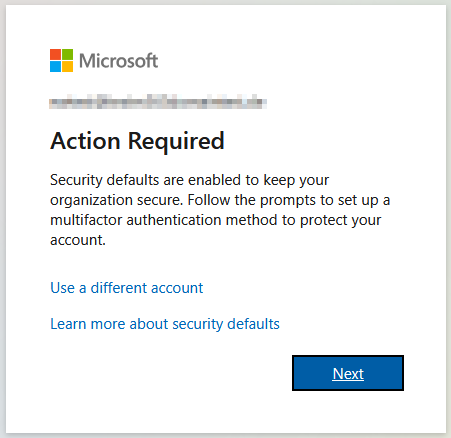
Wenn Sie sich das erste mal mit dem Konto anmelden, wird die Einrichtung der Multi Faktor Authentifizierung abgefragt.
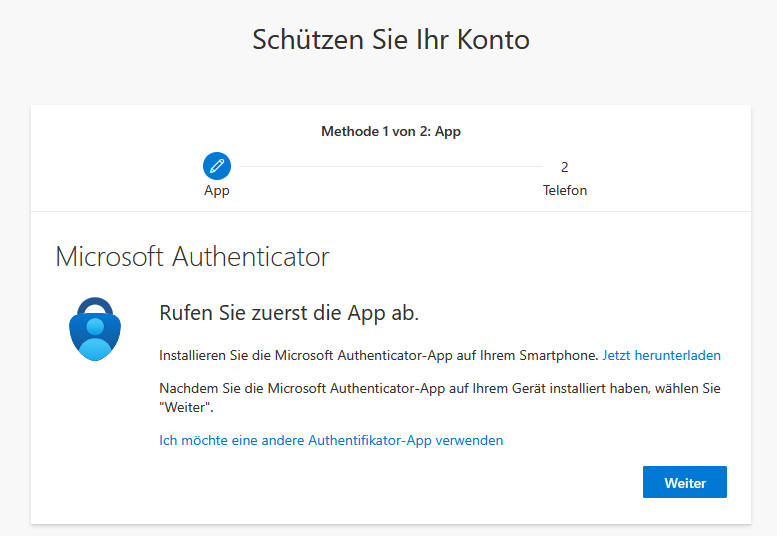
Methode 1: Authenticator App
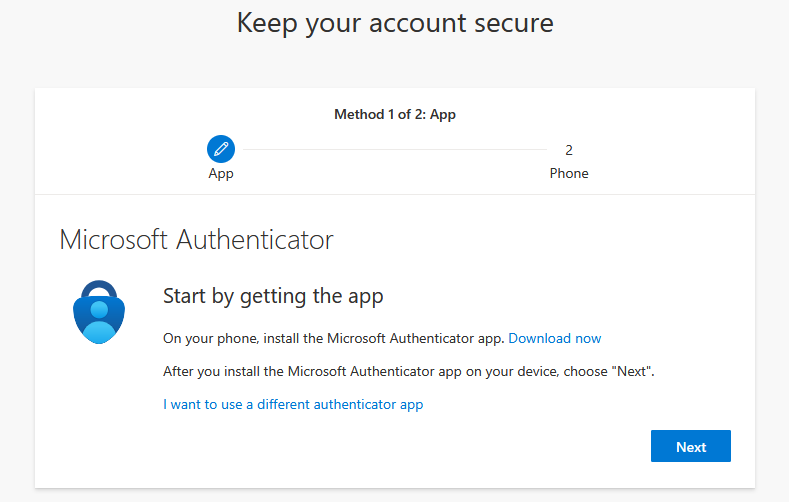
Die Einrichtung wird erst über die Microsoft Authenticator App vorgeschlagen. Sie können aber auch unten auf "Ich möchte eine andere Authenticator App verwenden" klicken, falls Sie eine alternative Authenticator App (bspw. Google Authenticator) nutzen möchten.
Die anschließende Vorgehensweise ist sehr ähnlich. Bestätigen Sie mit "Weiter" bis der QR Code angezeigt wird.
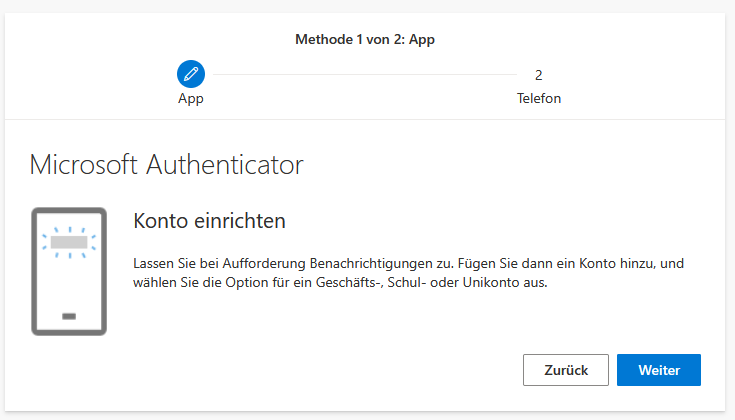

Nehmen Sie nun Ihr Mobilgerät mit dem gewünschten Authenticator zur Hand.
Falls Sie keine Authenticator App auf Ihrem Mobilgerät installiert haben, können Sie (bei Android über den Play Store und bei Apple über den App Store) eine entsprechende Authenticator App herunterladen.
Für den Microsoft Authenticator:
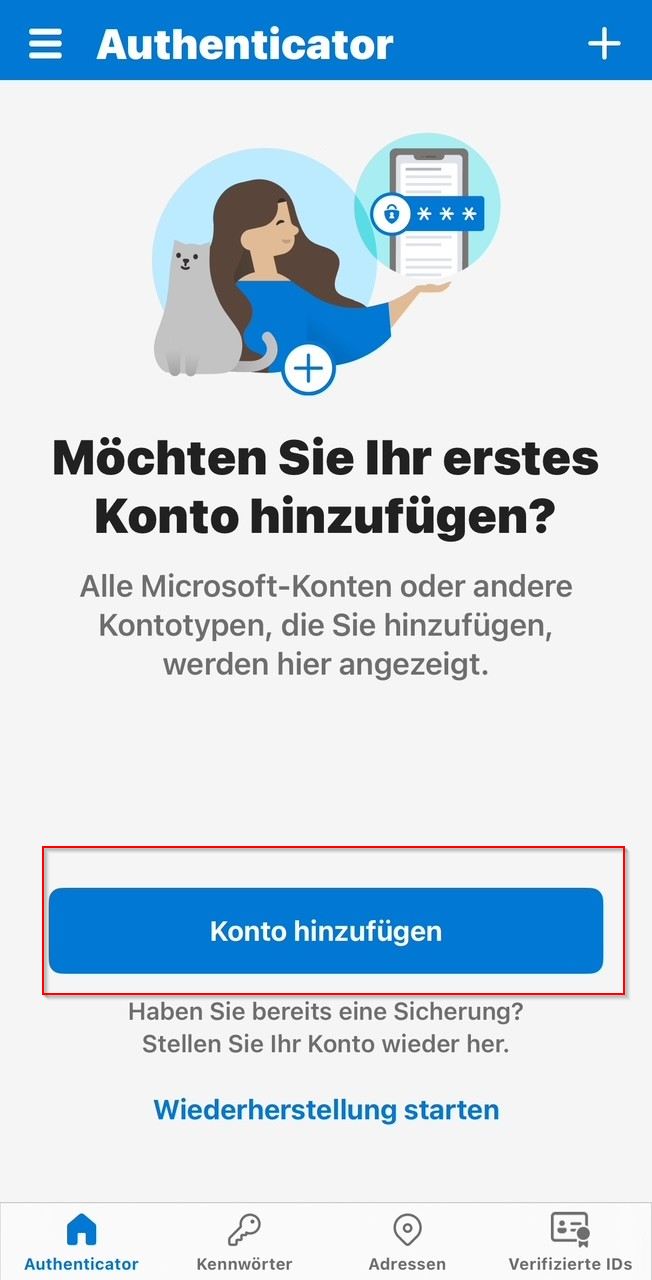
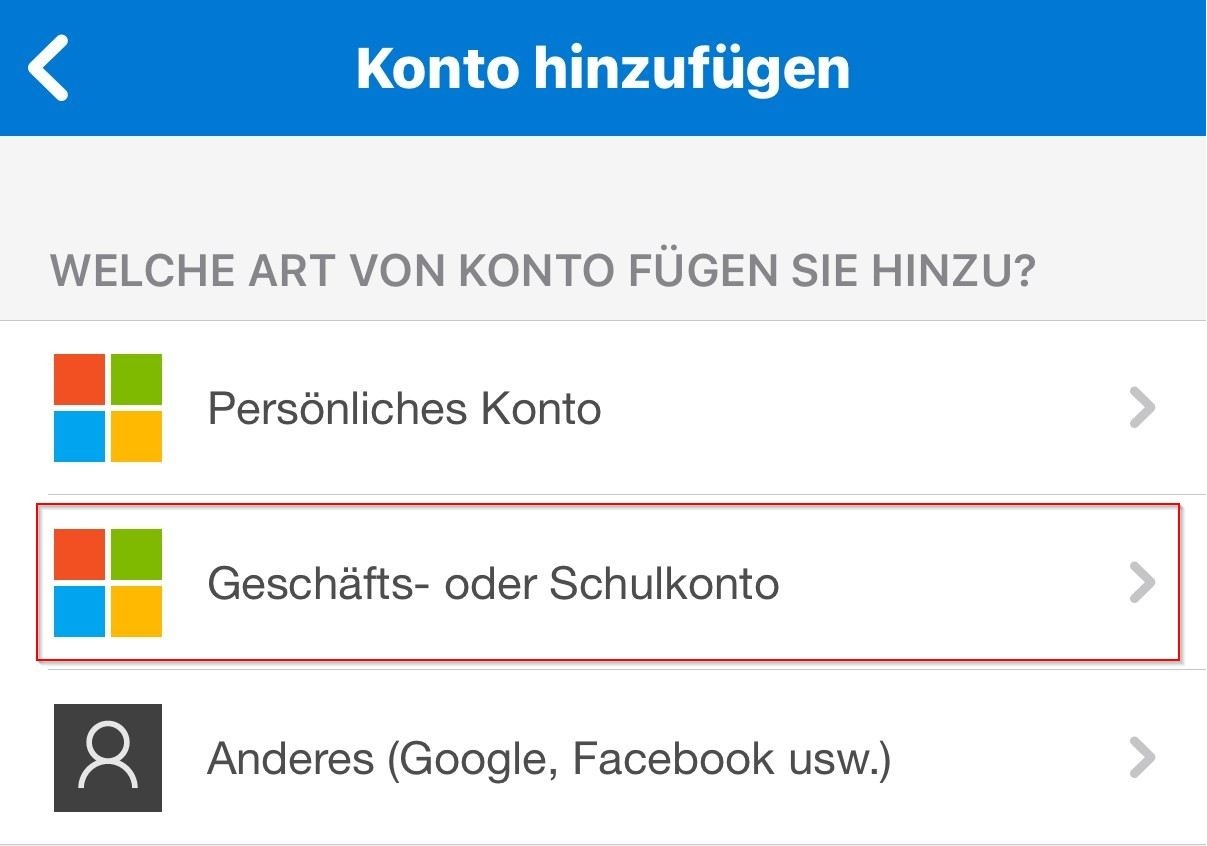
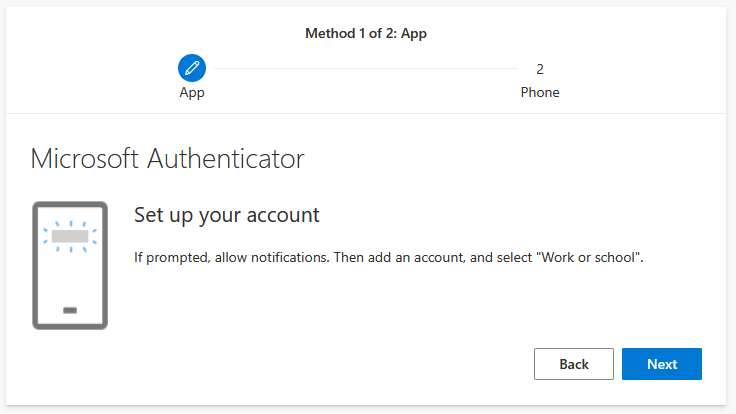
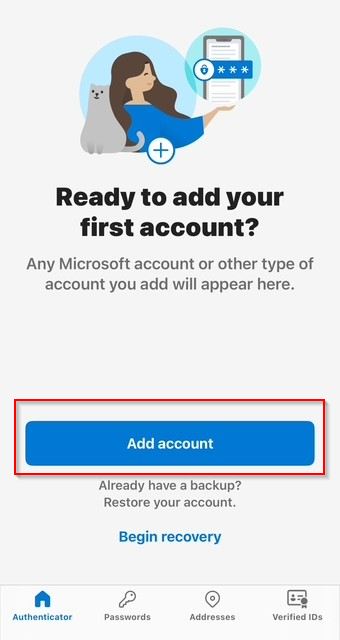
Nach der Installation der App auf Ihrem Smartphone klicken Sie bitte auf Konto hinzufügen:
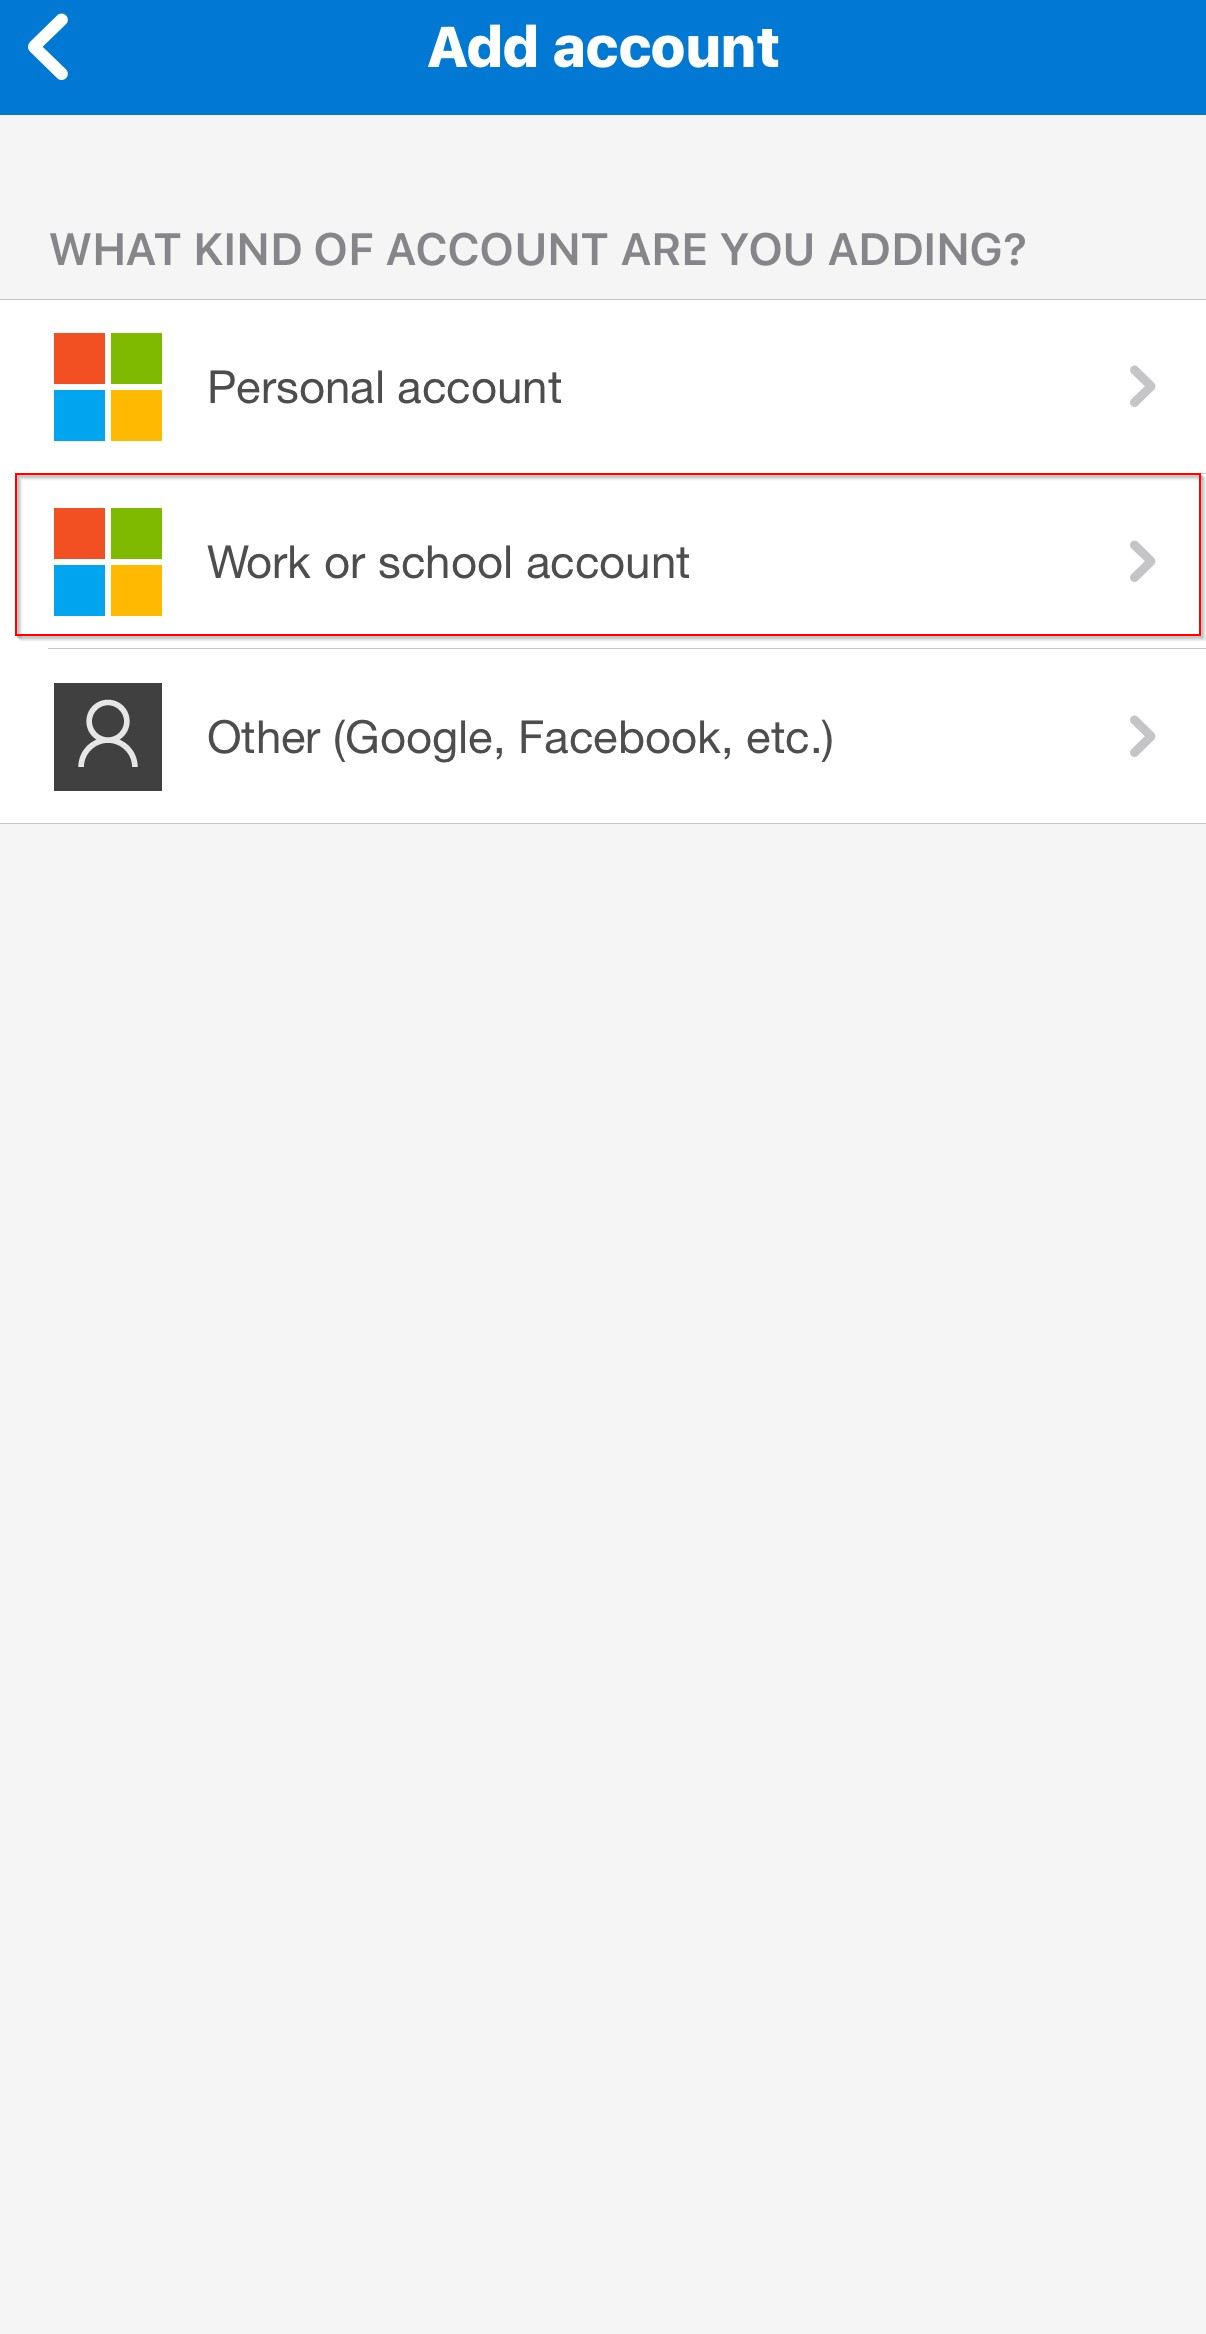
und wählen im nächsten Schritt "Geschäfts- oder Schulkonto" aus:
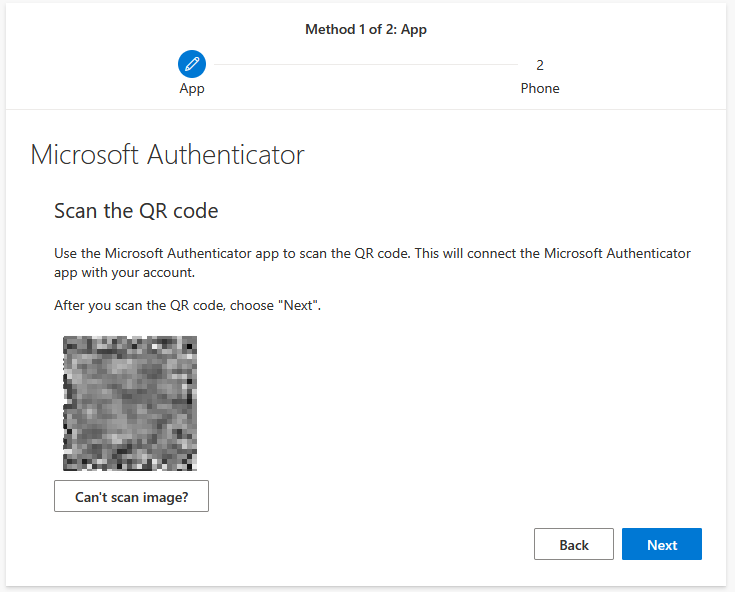
Klicken Sie nun auf QR-Code und scannen den angezeigten QR-Code Die App ist nun eingerichtet und wird ab sofort benötigt um sich auf den Microsoft Diensten anzumelden
Einrichtung anderer Authenticator-Apps (bspw. Google Authenticator):
- Wichtig: Wählen Sie im ersten Schritt "Ich möchte eine andere Authenticator App verwenden"
- Nachdem Sie die gewünschte Authenticator App installiert haben, klicken Sie auf + und wählen "QR-Code scannen" aus.
- Nun scannen Sie den QR-Code der auf Ihrem Computer angezeigt wird.
Geschafft! Bei jeder Anmeldung müssen Sie nun die Authenticator-App zur Verifizierung Ihrer Identität verwenden.
Es kann sein, dass Sie aufgefordert werden, eine zweite Anmeldemethode einzurichten, z.B. einen Anruf an Ihre Telefonnummer oder eine Verifizierung per alternativer E-Mail. Falls Sie jemals den Zugriff auf die Authenticator-App verlieren, können Sie die andere Methode nutzen, um auf Ihr Konto zuzugreifen.
Methode 2: Anruf
Bitte beachten: Sollten Sie die Verifizierung mit Ihrer Handynummer wünschen, lassen Sie sich bitte keine SMS zusenden (Aktuell werden keine SMS-Nachrichten versendet) wählen Sie stattdessen die Verifizierung Ihrer Handynummer "per Anruf" aus. Sie werden nach einer automatischen Ansage aufgefordert die Raute-Taste "#" zu drücken. Die Nummer wird anschließend verifiziert.
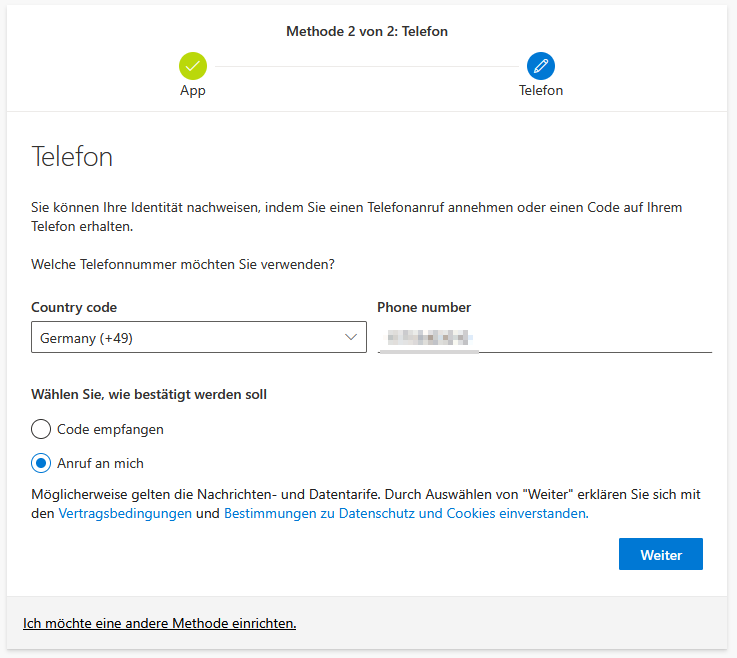
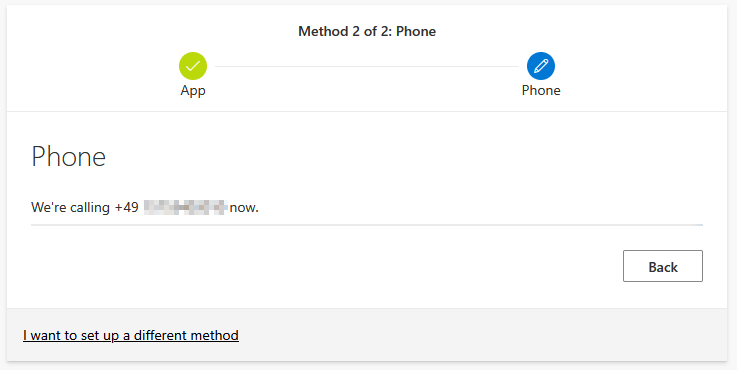
Wählen Sie die entsprechende Vorwahl und tragen Sie dann Ihre Handynummer ein. Danach klicken Sie auf "Weiter".
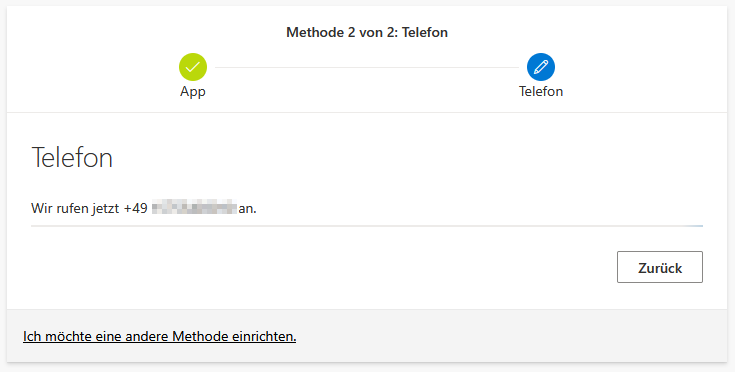
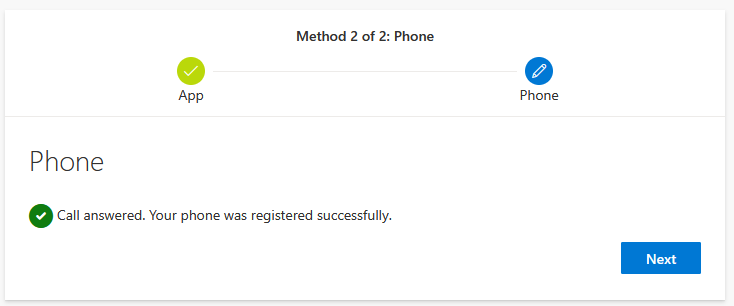
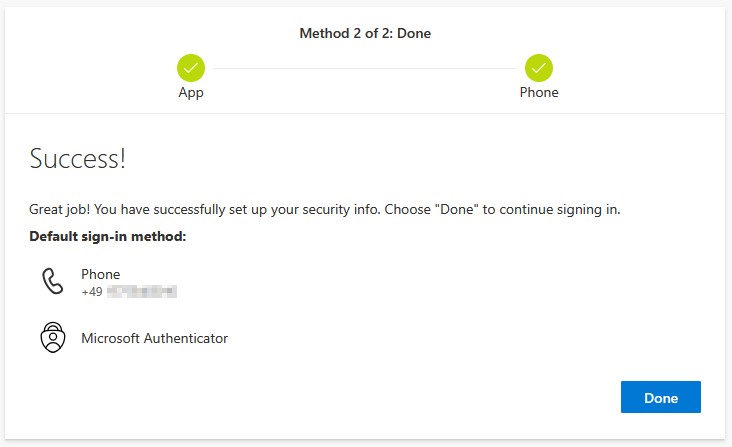
Nehmen Sie den Anruf an und bestätigen Sie diesen mit der # Taste auf Ihrem Mobilgerät.
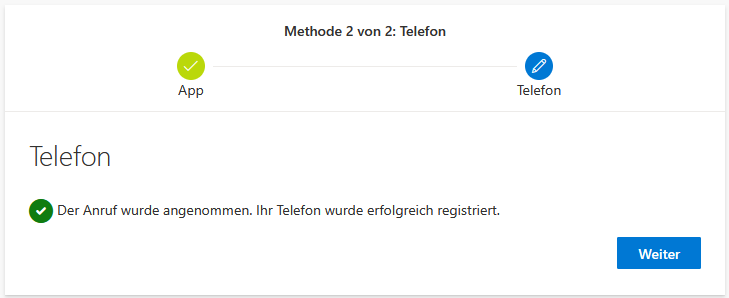
Klicken Sie auf "Weiter" und dann "Fertig". Danach ist auch die 2. Methode für die Verifizierung erledigt!

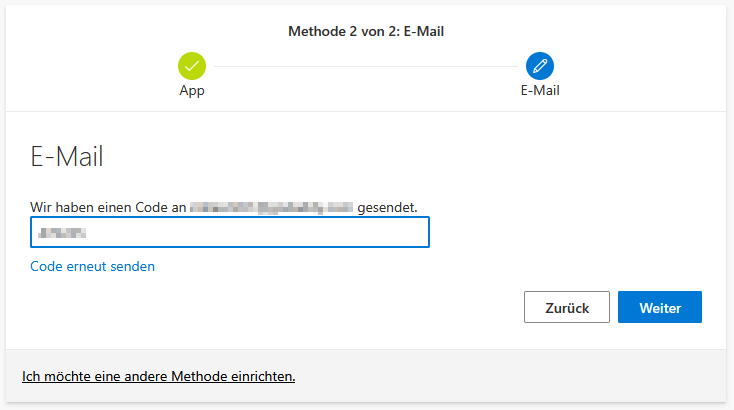
Methode 2: E-Mail
Falls Sie alternativ zum Anruf per E-Mail verifiziert werden möchten, klicken Sie auf "Ich möchte eine andere Methode einrichten".
Wählen Sie dann die Methode E-Mail. Tragen Sie anschließend Ihre alternative E-Mail Adresse ein.

. Sie erhalten dann einen Code per Mail, den Sie im nächsten Fenster eintragen können um die E-Mail Adresse zu bestätigen.
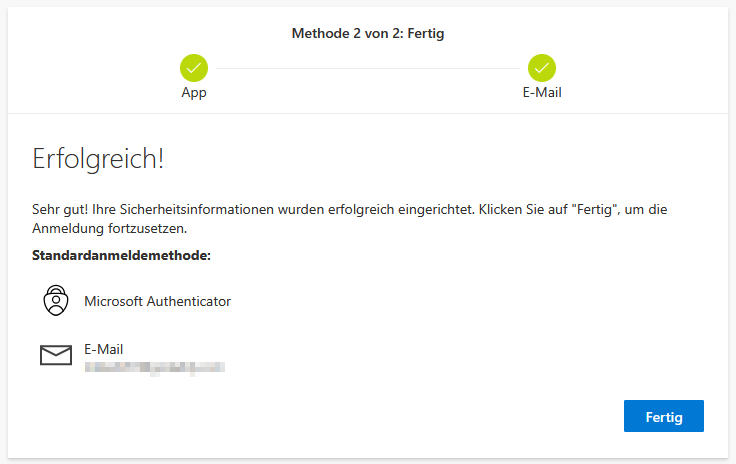
Klicken Sie auf "Weiter" und dann "Fertig". Danach ist auch die 2. Methode für die Verifizierung erledigt!
Hinzufügen einer zusätzlichen Authenticator-App:
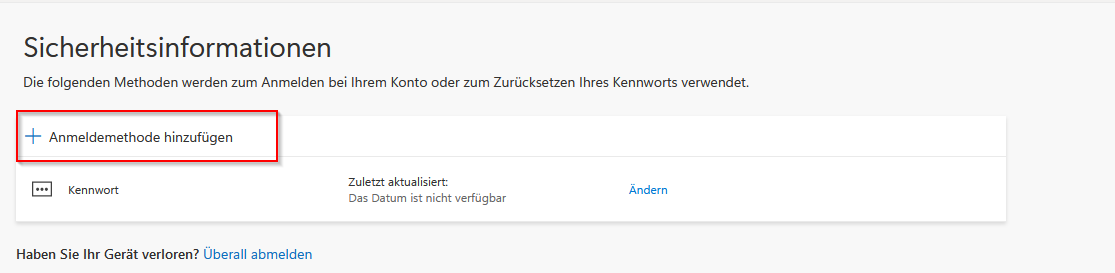
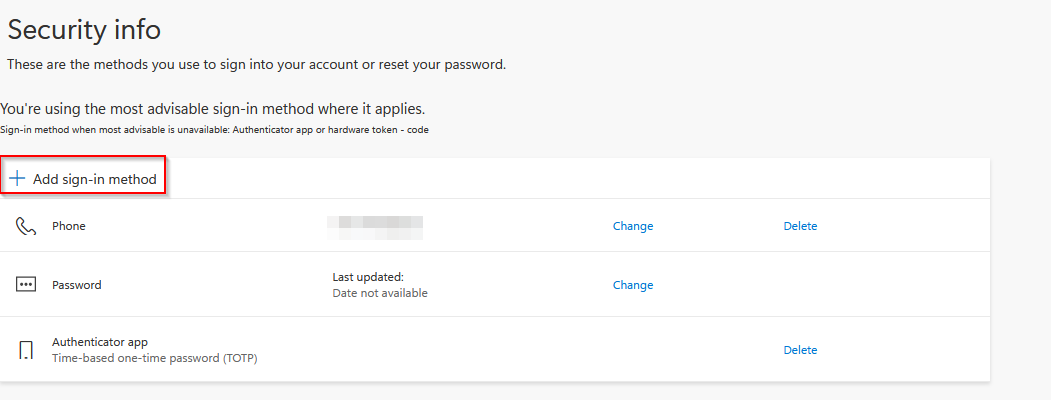
Melden Sie sich über Ihren Computer auf der Seite mysignins.microsoft.com/security-info an. Verwenden Sie Ihren Microsoft 365-Benutzernamen (E-Mail-Adresse) und Ihr Passwort Klicken Sie nun auf Anmeldemethode hinzufügen:
Nun wählen Sie "Microsoft Authenticator":
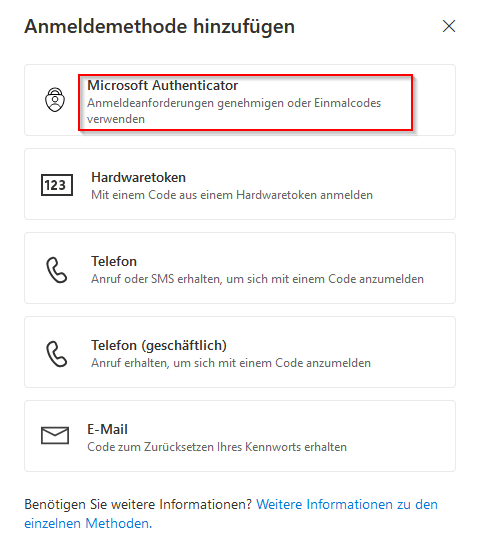
Wenn Sie den "Microsoft Authenticator" nutzen möchten, klicken Sie auf weiter bis der QR-Code angezeigt wird. Andernfalls wählen Sie "Ich möchte eine andere Authentifikator-App verwenden" aus. In beiden Fällen klicken Sie nun so lange auf Weiter bis der QR-Code angezeigt wird.
English Version:
How can I set up a multi-factor authentication method (MFA)?
Once you have enabled security standards or multi-factor authentication (MFA), you should set up your preferred login method to verify your identity each time you log in to your email. Since passwords can be forgotten or stolen, an additional login method provides significant protection against unauthorized access to your account.
You have the option of setting the Microsoft Authenticator app or another authenticator app (e.g. Google Authenticator) as the login method. You can either confirm a notification or enter a verification code provided.
Before you continue, make sure you have both your computer and your smartphone at hand.
Adding another Auth App (Generate new QR Code)
First time setup:
When you log in to your account for the first time, you will be asked to set up multi-factor authentication.
Method 1: Authenticator App
The setup is initially suggested via the Microsoft Authenticator app. However, you can also click on “I want to use a different authenticator app” at the bottom if you want to use an alternative authenticator app (e.g., Google Authenticator).
The subsequent procedure is very similar. Confirm with “Next” until the QR code is displayed.
Now grab your mobile device with the desired authenticator.
If you do not have an authenticator app installed on your mobile device, you can download one (from the Play Store for Android and the App Store for Apple).
For Microsoft Authenticator:
After installing the app on your smartphone, please click on Add Account:
and select ‘Business or school account’ in the next step:
Now click on QR code and scan the QR code displayed The app is now set up and is required to log in to Microsoft services
Setting up other authenticator apps (e.g. Google Authenticator):
Once you have installed the desired authenticator app, click on + and select ‘Scan QR code’. Now scan the QR code displayed on your computer.
Done! You will now have to use the authenticator app to verify your identity every time you log in.
You may be asked to set up a second login method, such as a call to your phone number or another authenticator app. If you ever lose access to the authenticator app, you can use the other method to access your account
Method 2: Call
Please note: If you wish to verify your mobile phone number, please do not request an SMS (SMS messages are currently not being sent). Instead, select the option to verify your mobile phone number ‘by Call ME’. After an automated message, you will be asked to press the hash key ‘#’. Your number will then be verified.

Select the appropriate area code and then enter your mobile phone number. Then click on “Continue.”
Answer the call and confirm it by pressing the # key on your mobile device.
Click “Next” and then “Done”. After that, the second verification method is also complete!
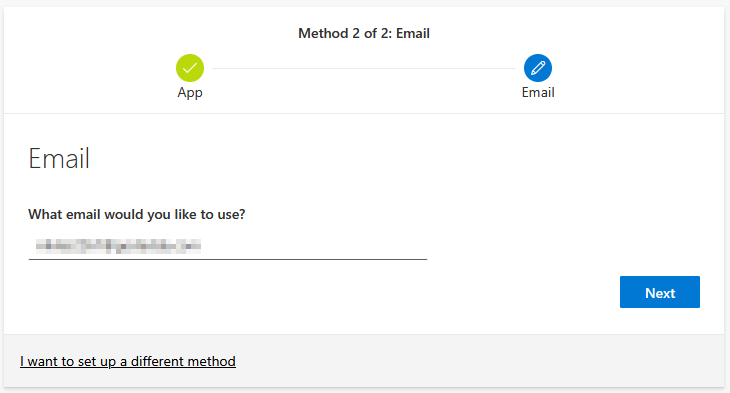
Method 2: E-Mail
If you would like to be verified by email instead of by phone call, click on “I want to set up a different method.”
Then select the email method. Next, enter your alternative email address.
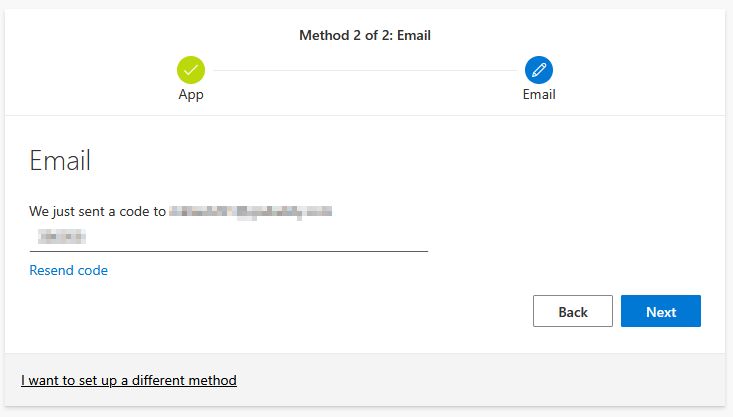
You will then receive a code by email, which you can enter in the next window to confirm your email address.
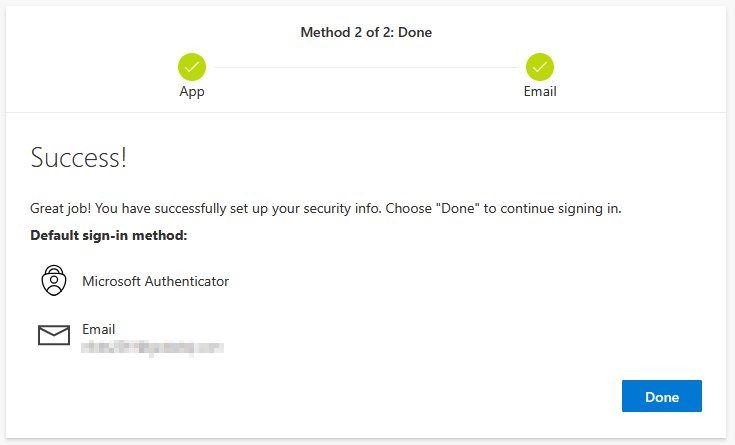
Click “Next” and then "Done”. After that, the second verification method is also complete!
Add additional app (generate new QR code):
Set up the desired authenticator app: Log in to mysignins.microsoft.com/security-info on your computer. Use your Microsoft 365 username (email address) and password. Now click on Add sign-in method:
Now select ‘Microsoft Authenticator:
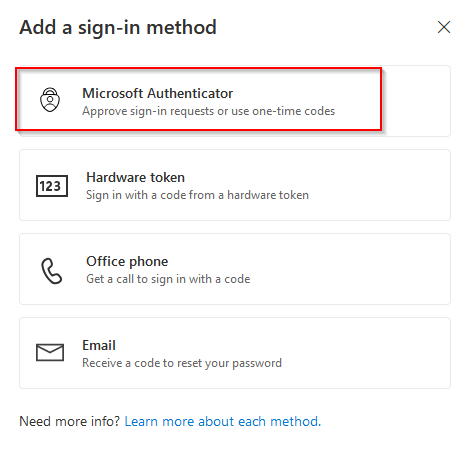
If you want to use Microsoft Authenticator, click Continue until the QR code is displayed. Otherwise, select I want to use a different authenticator app. In both cases, click Continue until the QR code is displayed