In dieser Anleitung erklären wir Ihnen, wie Sie die zuvor im KIS eingerichteten E-Mail-Adressen in Ihrem Thunderbird einbinden können.
Was wird eingerichtet?
IMAP mit TLS-Verschlüsselung ⇒ empfohlen!
Mit welcher Version von Thunderbird funktioniert diese Anleitung?
Thunderbird 91.3
Kurzanleitung:
Für die Einrichtung eines Mailkontos benötigen Sie folgende Informationen:
→ Posteingangsserver: wpxxxxxxx.mail.server-he.de (Hinweis: Der Platzhalter "XXXXXXX" entspricht der ID Ihres Vertrages)
→ empfohlene Verschlüsselung: TLS
→ Postausgangsserver: wpxxxxxxx.mailout.server-he.de (Hinweis: Der Platzhalter "XXXXXXX" entspricht der ID Ihres Vertrages)
→ empfohlene Verschlüsselung: TLS
→ Benutzername: wpxxxxxxx-Kontoname* (Hinweis: Der Platzhalter "XXXXXXX" entspricht der ID Ihres Vertrages)
→ Passwort: (ihr selbst definiertes Passwort)
*Den Kontonamen haben Sie im KIS beim Anlegen des E-Mailkontos selbst vergeben.
Ausführliche Anleitung:
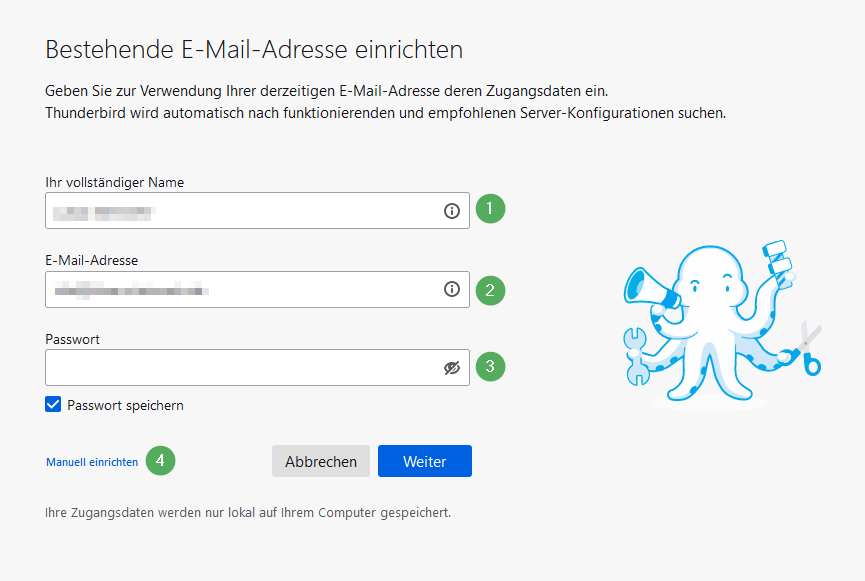
Um ein neues Konto im Thunderbird hinzuzufügen, gehen Sie in der oberen Leiste im Thunderbird bitte auf "Datei" -> "Neu" -> "Existierendes E-Mail Konto ..."| Es öffnet sich beim ersten Programmstart direkt das Fenster "Willkommen bei Thunderbird". Klicken Sie hier auf Überspringen und meine existierende E-Mail-Adresse verwenden.
1. Hier geben Sie bitte Ihren Namen ein, der als Absender angezeigt werden soll
2. Hier geben Sie bitte Ihre E-Mail Adresse ein
3. Hier erfolgt die Eingabe Ihres Passworts für das E-Mail-Konto.
4. Nun klicken Sie bitte auf den Punkt "Manuell bearbeiten".

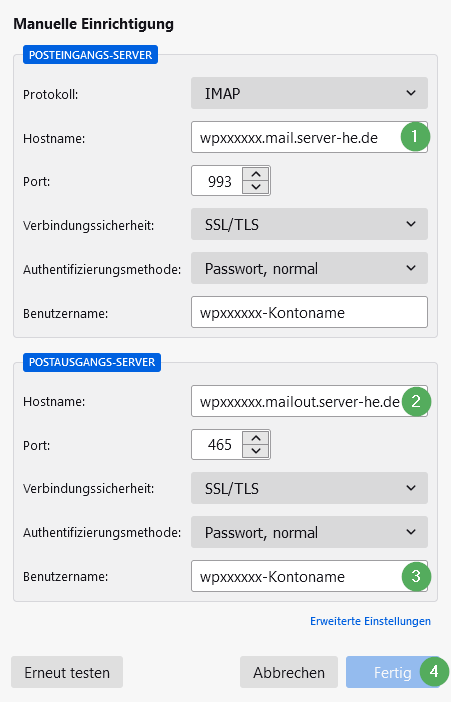
1. Geben Sie bitte den direkten Posteingang-Servernamen ein: "wpxxxxxx.mail.server-he.de". (Beachten Sie bitte, dass es sich hier lediglich um einen Beispielnamen handelt. Ihre persönlichen Informationen entnehmen Sie bitte dem KIS. Der Weg dorthin ist zu Beginn dieses Artikels erläutert)
2. Geben Sie bitte den direkten Postausgang-Servernamen ein: "wpxxxxxx.mailout.server-he.de". (Beachten Sie bitte, dass es sich hier lediglich um einen Beispielnamen handelt. Ihre persönlichen Informationen entnehmen Sie bitte dem KIS. Der Weg dorthin ist zu Beginn dieses Artikels erläutert)
3. Der Benutzername ist gleich dem Kontennamen Ihres E-Mail Kontos "wpxxxxxxx-kontennamen" (Ebenfalls nur ein Beispiel). Der eingegebene Benutzername wird automatisch für den Posteingang und Postausgang übernommen.
4. Abschließend erstellen Sie das Konto mittels dem Button "Fertig"

Achtung:
Aktuell macht Thunderbird Probleme in Bezug auf den Virenscanner ESET, nachdem ein Update auf Version 78 durchgeführt wurde.
Damit das Anti-Virus-Programm ESET die von Thunderbird herunterzuladenden E-Mails auf Schadcode prüfen kann, installiert ESET ein Sicherheitszertifikat in Thunderbird. Dies ist technisch notwendig, um die E-Mails auf Schadcode prüfen zu können. Nach einer Aktualisierung von Thunderbird kommt es leider immer wieder zu Problemen mit diesen Zertifikaten von Anti-Virus-Programmen.
Nachfolgende Anleitung bietet eine Hilfestellung für den Austausch des ESET-Zertifikats in Thunderbird:
- ESET NOD32 Antivirus öffnen -> Einstellungen -> Erweiterte Einstellungen -> Web und E-Mail -> SSL/TLS
- Dort die SSL/TLS-Protokollfilterung deaktivieren.
- Thunderbird öffnen -> Einstellungen -> Zertifikate verwalten
- Dort bitte prüfen, ob ein ESET-Zertifikat vorhanden ist, falls ja entfernen.
- Anschließend bitte mit dem PC einen Neustart durchführen.
- Danach, ohne irgendein anderes Programm/App zu starten, bitte zunächst ESET NOD32 Antivirus öffnen.
- Klicken Sie auf Einstellungen -> Erweiterte Einstellungen -> Web und E-Mail -> SSL/TLS
- Dort bitte die SSL/TLS-Protokollfilterung aktivieren.
- Nun Thunderbird öffnen -> Einstellungen -> Zertifikate verwalten
- Prüfen Sie bitte, ob nun ein ESET Zertifikat vorhanden ist. Hier sollte nun Folgendes angezeigt werden:
- Beginn (aktuelles Datum plus Uhrzeit)
- Ende 30.10.2030 (plus Uhrzeit)
English version:
In these instructions we explain how you can integrate the e-mail addresses previously set up in the KIS in your Thunderbird.
What will be set up?
IMAP with TLS encryption ⇒ recommended!
Which version of Thunderbird does this guide work with?
Thunderbird 91.3
Quick start Guide:
To set up a mail account you need the following information:
→ Incoming mail server: wpxxxxxxx.mail.server-he.de (Note: The placeholder "XXXXXXX" corresponds to the ID of your contract)
→ Recommended encryption: TLS
→ Outgoing mail server: wpxxxxxxx.mailout.server-he.de (Note: The placeholder "XXXXXXX" corresponds to the ID of your contract)
→ Recommended encryption: TLS
→ Username: wpxxxxxxx account name* (Note: The placeholder "XXXXXXX" corresponds to the ID of your contract)
→ Password: (your self-defined password)
*You assigned the account name yourself in the KIS when you set up the e-mail account..
Detailed instructions:
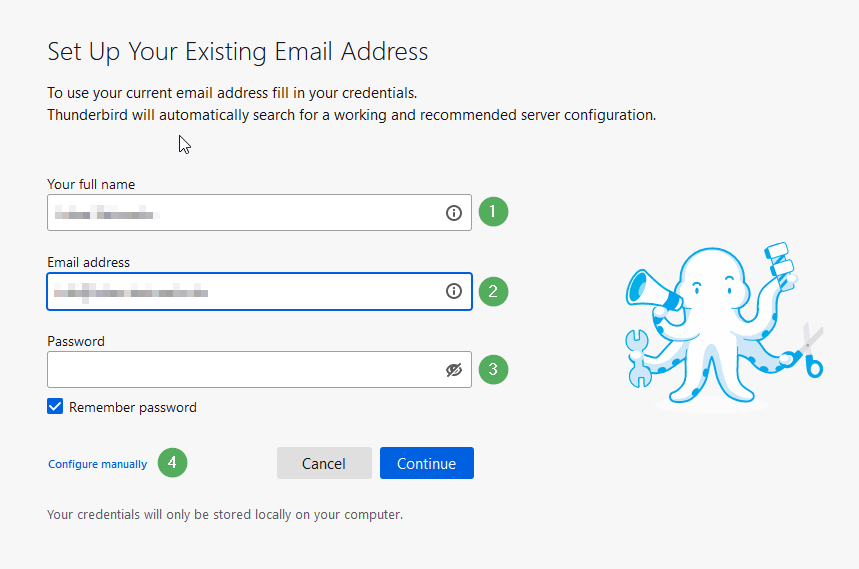
To add a new account in Thunderbird, please go to "File" -> "New" -> "Existing e-mail account ..." | in the upper bar in Thunderbird When the program is started for the first time, the "Welcome to Thunderbird" window opens. Click here on skip and use my existing email address.
1. Please enter your name here, which should be displayed as the sender
2. Please enter your email address here
3. Enter your password for the e-mail account here.
4. Now please click on the point "Edit manually".

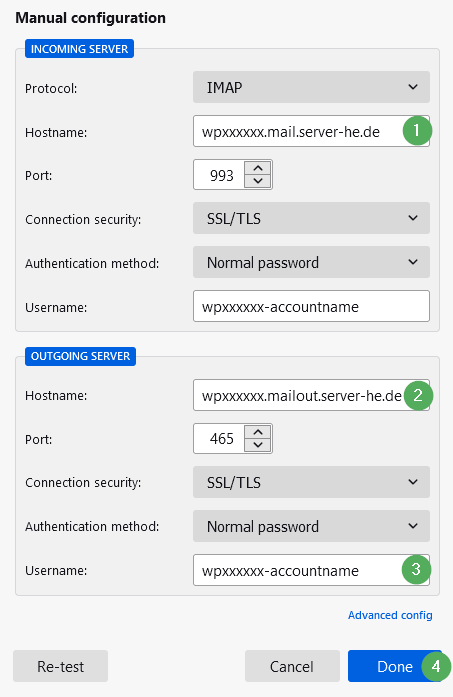
1. Please enter the incoming mail server name: "wpxxxxxx.mail.server-he.de". ((Please note that this is only an example name. Please refer to the KIS for your personal information. How to get there is explained at the beginning of this article)
2. Please enter the outgoing mail server name: "wpxxxxxx.mailout.server-he.de". (Please note that this is only an example name. Please refer to the KIS for your personal information. How to get there is explained at the beginning of this article)
3. The user name is the same as the account name of your e-mail account "wpxxxxxxx-accountname" (also just an example). The user name entered is automatically adopted for the inbox and outbox.
4. Finally, create the account using the "Done" button

Attention:
Thunderbird is currently causing problems with the ESET virus scanner after an update to version 78 has been carried out.
ESET installs a security certificate in Thunderbird so that the anti-virus program ESET can check the e-mails downloaded from Thunderbird for malicious code. This is technically necessary in order to be able to check the e-mails for malicious code. After updating Thunderbird, problems with these certificates from anti-virus programs occur again and again.
The following instructions will help you to replace the ESET certificate in Thunderbird:
- Open ESET NOD32 Antivirus -> Settings -> Advanced Settings -> Web and Email -> SSL / TLS
- Deactivate the SSL / TLS protocol filtering there.
- Open Thunderbird -> Settings -> Manage Certificates
- Please check there whether there is an ESET certificate, if so remove it.
- Then please restart the PC.
- Then, without starting any other program / app, please open ESET NOD32 Antivirus first.
- Click Settings -> Advanced Settings -> Web and Email -> SSL / TLS
- Please activate the SSL / TLS protocol filtering there.
- Now open Thunderbird -> Settings -> Manage certificates
- Please check whether you now have an ESET certificate. The following should now be displayed:
- Start (current date plus time)
- End of October 30th, 2030 (plus time)